讓你的 Container Image 逃脫 Kubelet Image GC 的魔掌
本篇文章筆記一下如何讓 container image 可以跳過 Kubelet image GC 的階段而被保存到節點中
使用情境
- 有些部署環境(airgap)無法透過網路去抓取 Image,因此必須要事先將 Container Image 事先載入到節點中,並且透過 "ImagePullPolicy:Never" 的方式來部署容器,而這種情況下 就會希望相關 Image 能夠保存於節點上而不要被 Kubelet GC 給回收掉
- 有些開發者使用 KIND 來搭建測試用的 Kubernetes 節點,部署的 Container Image 也是從節點載入而非可以網路上抓取的,因此長期使用上也希望某些 image 可以保留而不要被 GC
Kubelet GC
根據 Kubernetes 的官網文章 Garbage Collection所述, Kubernetes 透過 Kubelet 內的 image manager 來執行 Image GC。
Image GC 的執行會根據兩個參數 HighThresholdPercent 以及 LowThresholdPercent 來控管 Image GC 的執行邏輯,當系統硬碟用量超過 HighThresholdPercent 時就會觸發 GC,並且根據 Image 上次使用時間為基礎去逐漸刪除 Image 直到系統用量低於 LowThresholdPercent。
上述兩個參數的預設值分別為 85/80,如下列程式碼
// imageGCHighThresholdPercent is the percent of disk usage after which
// image garbage collection is always run. The percent is calculated by
// dividing this field value by 100, so this field must be between 0 and
// 100, inclusive. When specified, the value must be greater than
// imageGCLowThresholdPercent.
// Default: 85
// +optional
ImageGCHighThresholdPercent *int32 `json:"imageGCHighThresholdPercent,omitempty"`
// imageGCLowThresholdPercent is the percent of disk usage before which
// image garbage collection is never run. Lowest disk usage to garbage
// collect to. The percent is calculated by dividing this field value by 100,
// so the field value must be between 0 and 100, inclusive. When specified, the
// value must be less than imageGCHighThresholdPercent.
// Default: 80
// +optional
ImageGCLowThresholdPercent *int32 `json:"imageGCLowThresholdPercent,omitempty"`
然而實際上該文件內容並沒有解釋到詳細流程,程式碼內還有一些隱藏的實作細節,因此接下來就來透過閱讀程式碼 學習整體流程
實作
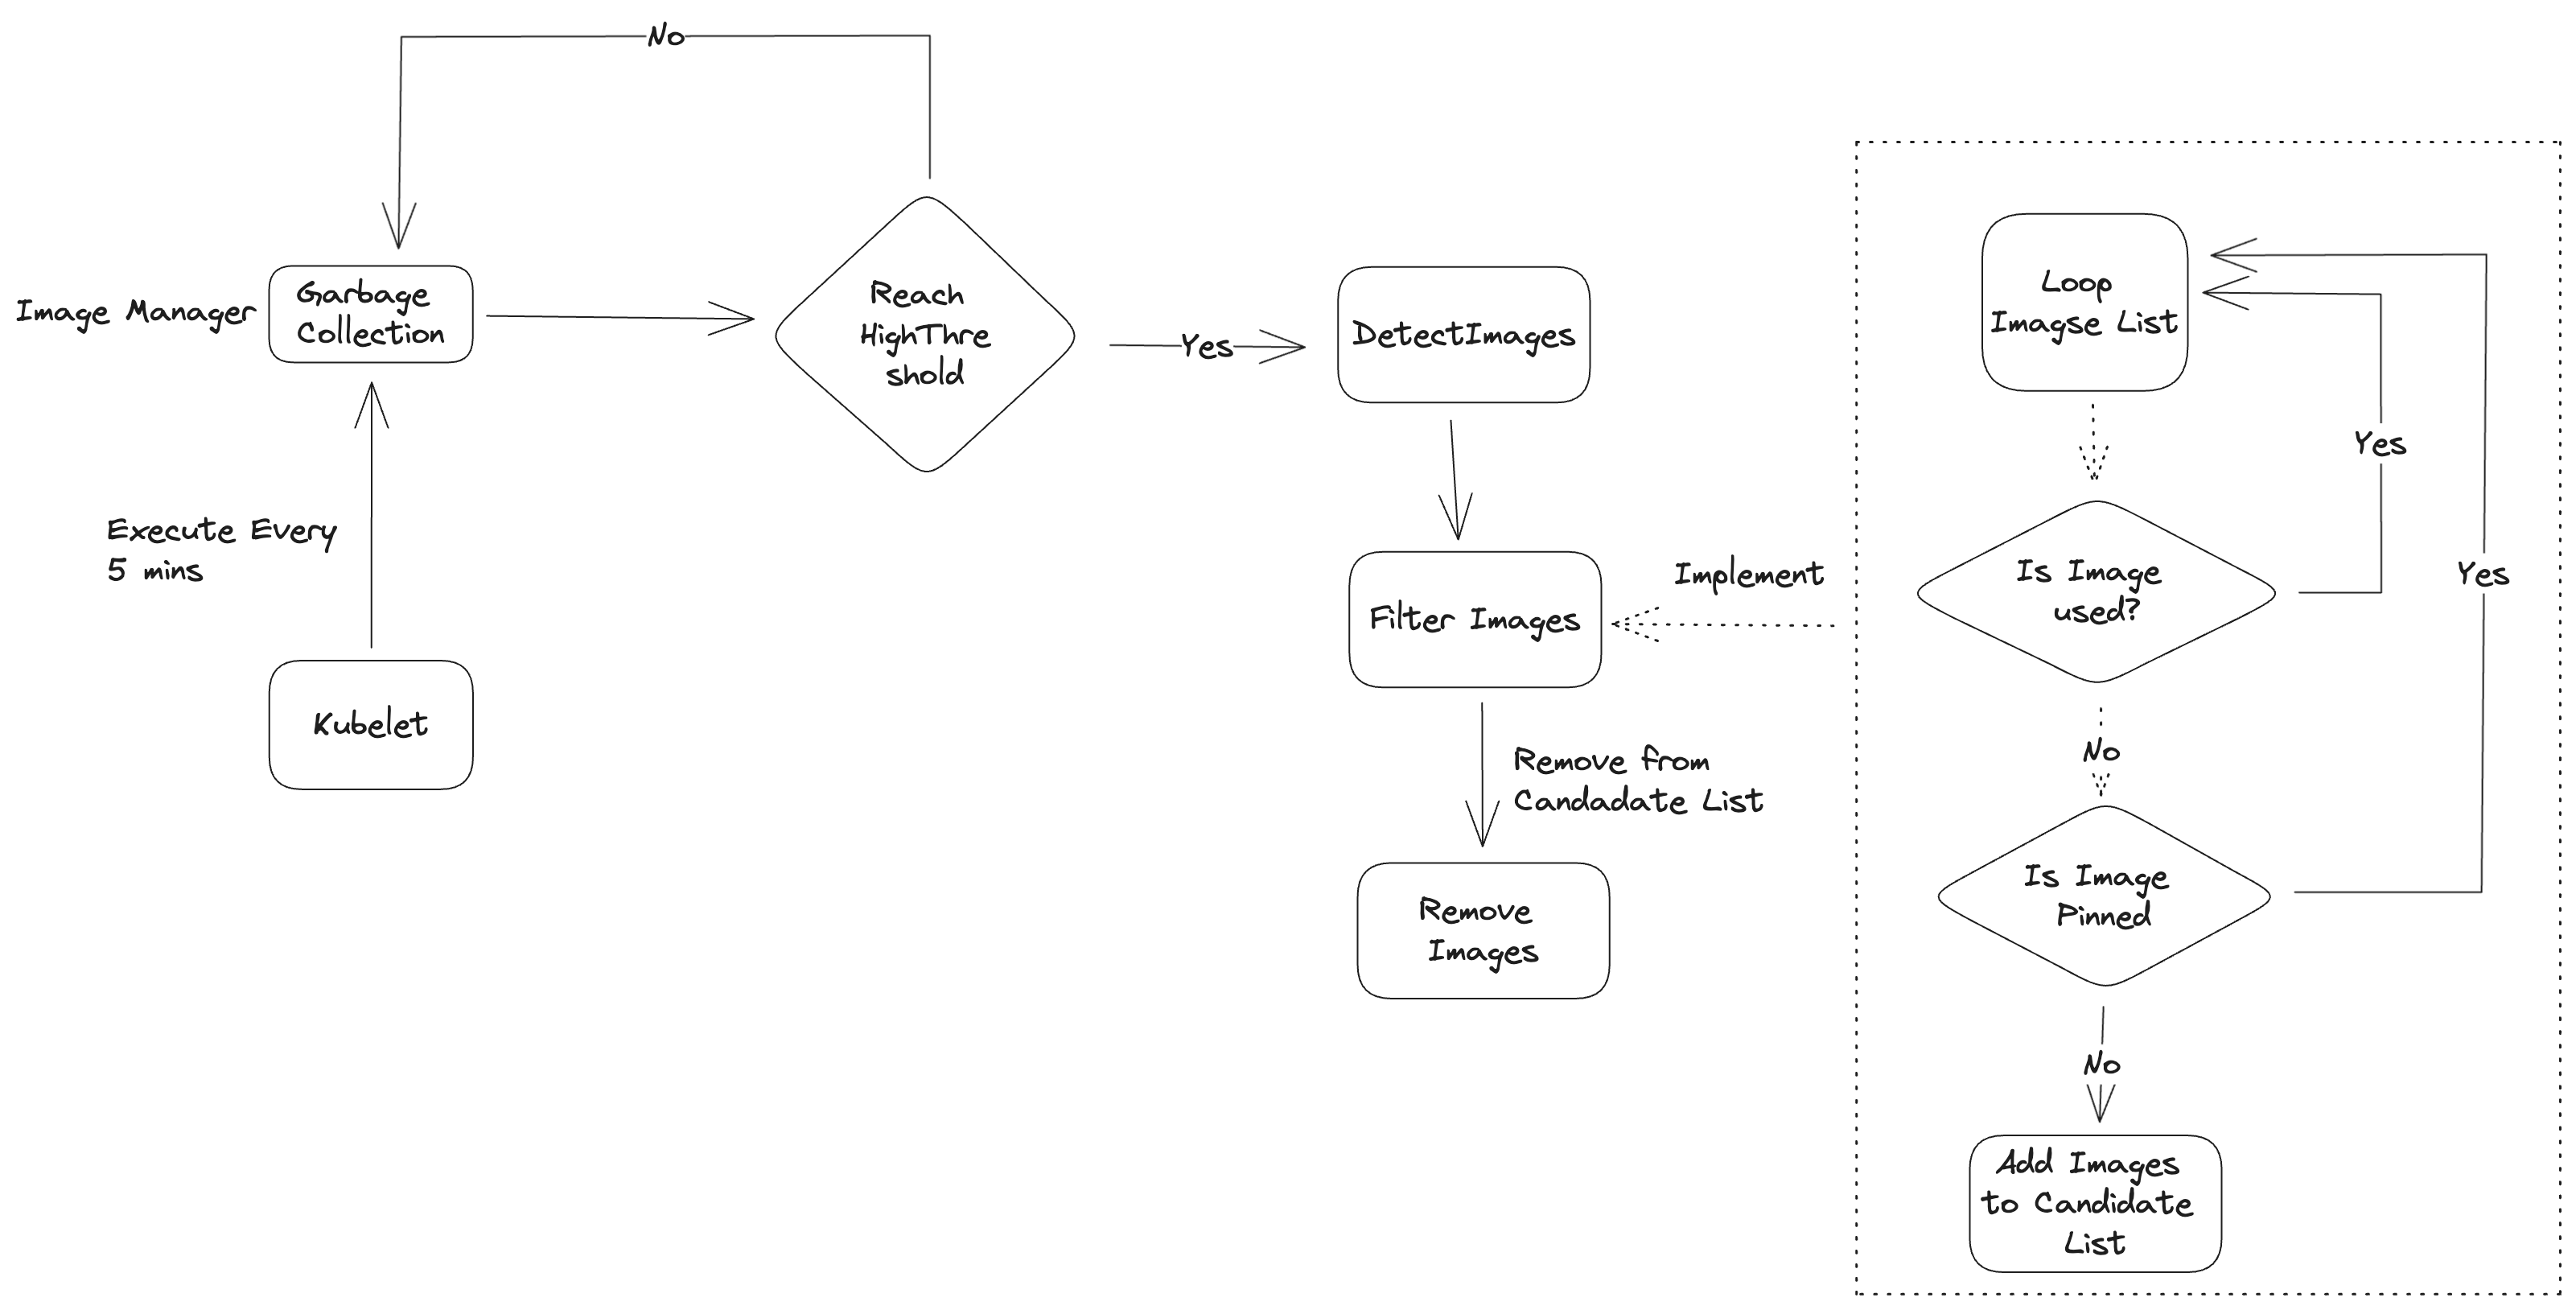
如文件所述, Kubelet 內的 ImageManager 會負責處理相關 GC 流程,因此從 Kubelet 內的程式碼可以看到其每五分鐘會呼叫一次 ImageManager 內的 GarbageCollect 來處理。
const (
...
    // ImageGCPeriod is the period for performing image garbage collection.
    ImageGCPeriod = 5 * time.Minute
...
)
...
go wait.Until(func() {
    ctx := context.Background()
    if err := kl.imageManager.GarbageCollect(ctx); err != nil {
        if prevImageGCFailed {
            klog.ErrorS(err, "Image garbage collection failed multiple times in a row")
            // Only create an event for repeated failures
            kl.recorder.Eventf(kl.nodeRef, v1.EventTypeWarning, events.ImageGCFailed, err.Error())
        } else {
            klog.ErrorS(err, "Image garbage collection failed once. Stats initialization may not have completed yet")
        }
        prevImageGCFailed = true
    } else {
        var vLevel klog.Level = 4
        if prevImageGCFailed {
            vLevel = 1
            prevImageGCFailed = false
        }

        klog.V(vLevel).InfoS("Image garbage collection succeeded")
    }
}, ImageGCPeriod, wait.NeverStop)
...
而 GarbaeCollect 內的程式碼最後則有一個 HighThresholdPercent 的判斷。
當前使用量超過該標準時,就會計算需要移除多少空間來低於 LowThreholdPercent 並且呼叫內部的 freeSpace 去移除空間
...
usagePercent := 100 - int(available*100/capacity)
if usagePercent >= im.policy.HighThresholdPercent {
    amountToFree := capacity*int64(100-im.policy.LowThresholdPercent)/100 - available
    klog.InfoS("Disk usage on image filesystem is over the high threshold, trying to free bytes down to the low threshold", "usage", usagePercent, "highThreshold", im.policy.HighThresholdPercent, "amountToFree", amountToFree, "lowThreshold", im.policy.LowThresholdPercent)
    freed, err := im.freeSpace(ctx, amountToFree, time.Now())
    if err != nil {
        return err
    }

    if freed < amountToFree {
        err := fmt.Errorf("Failed to garbage collect required amount of images. Attempted to free %d bytes, but only found %d bytes eligible to free.", amountToFree, freed)
        im.recorder.Eventf(im.nodeRef, v1.EventTypeWarning, events.FreeDiskSpaceFailed, err.Error())
        return err
    }
}
...
fresSpace 首先會先呼叫 detectImages 從系統抓取當前運行的 Images 資訊,接者運行一個迴圈從中過濾掉不需要的 Image,最後再根據 Image 的最後被使用來進行排序,排序後則會有一個額外的迴圈去移除 Image 直到空間足夠為止。
這邊的過濾條件也補充了文件中沒有說明的細節,說明了哪些 Image 會被 GC 給忽略
- Image 正在被使用
- Image 本身有 pinned 的屬性
func (im *realImageGCManager) freeSpace(ctx context.Context, bytesToFree int64, freeTime time.Time) (int64, error) {
    imagesInUse, err := im.detectImages(ctx, freeTime)
    if err != nil {
        return 0, err
    }


    // Get all images in eviction order.
    images := make([]evictionInfo, 0, len(im.imageRecords))
    for image, record := range im.imageRecords {
        if isImageUsed(image, imagesInUse) {
            klog.V(5).InfoS("Image ID is being used", "imageID", image)
            continue
        }
        // Check if image is pinned, prevent garbage collection
        if record.pinned {
            klog.V(5).InfoS("Image is pinned, skipping garbage collection", "imageID", image)
            continue

        }
        images = append(images, evictionInfo{
            id:          image,
            imageRecord: *record,
        })
    }
    sort.Sort(byLastUsedAndDetected(images))
...
觀察到 pinned 的相關概念後,翻了sig-node/2040-kubelet-cri 內的文件也可以看到這段說明
Introduce field in the Image message to indicate an image should not be garbage collected:
相關程式碼也於 2021 左右於這隻 PR 內實作。
此外也可以從 Containerd 的相關 Issue 看到相關實作,而該功能最後於 Containerd 1.7 後釋出,使用者可以透過下列兩種指令去 pin image。
sudo ctr -n k8s.io images label docker.io/library/jenkins:2.60.1 io.cri-containerd.pinned=pinned
sudo ctr -n k8s.io images pull --label=io.cri-containerd.pinned=pinned docker.io/library/jenkins:2.60.1
實驗
有了上述概念後,接下來就要準備一個 Kubernetes 環境來驗證上述概念
環境
$ kubectl version
Client Version: v1.28.2
Kustomize Version: v5.0.4-0.20230601165947-6ce0bf390ce3
Server Version: v1.28.2
$ ctr --version
ctr github.com/containerd/containerd v1.7.6
$ lsb_release -a
No LSB modules are available.
Distributor ID: Ubuntu
Description:    Ubuntu 23.04
Release:        23.04
Codename:       lunar
實驗
首先透過 ctr 指令與 containerd 互動並且觀察相關 image 狀況,其中 Kubernetes 預設會使用 "k8s.io" namespace,因此使用上都要加上 "-n k8s.io"
透過 imags ls 去檢視所有 image 的狀況,可以發現 pause 系列的 image 預設就會有 "io.cri-containerd.pinned=pinned" 這個選項,而其他 image 都沒有。
$ sudo ctr -n k8s.io image ls
...
registry.k8s.io/pause:3.6                                                                                      application/vnd.docker.distribution.manifest.list.v2+json sha256:3d380ca8864549e74af4b29c10f9cb0956236dfb01c40ca076fb6c37253234db 294.7 KiB linux/amd64,linux/arm/v7,linux/arm64,linux/ppc64le,linux/s390x,windows/amd64 io.cri-containerd.image=managed,io.cri-containerd.pinned=pinned
registry.k8s.io/pause@sha256:3d380ca8864549e74af4b29c10f9cb0956236dfb01c40ca076fb6c37253234db                  application/vnd.docker.distribution.manifest.list.v2+json sha256:3d380ca8864549e74af4b29c10f9cb0956236dfb01c40ca076fb6c37253234db 294.7 KiB linux/amd64,linux/arm/v7,linux/arm64,linux/ppc64le,linux/s390x,windows/amd64 io.cri-containerd.image=managed,io.cri-containerd.pinned=pinned
docker.io/calico/cni:v3.26.1                                                                                   application/vnd.docker.distribution.manifest.list.v2+json sha256:3be3c67ddba17004c292eafec98cc49368ac273b40b27c8a6621be4471d348d6 89.0 MiB  linux/amd64,linux/arm/v7,linux/arm64,linux/ppc64le,linux/s390x               io.cri-containerd.image=managed
docker.io/calico/cni@sha256:3be3c67ddba17004c292eafec98cc49368ac273b40b27c8a6621be4471d348d6                   application/vnd.docker.distribution.manifest.list.v2+json sha256:3be3c67ddba17004c292eafec98cc49368ac273b40b27c8a6621be4471d348d6 89.0 MiB  linux/amd64,linux/arm/v7,linux/arm64,linux/ppc64le,linux/s390x               io.cri-containerd.image=managed
...
接下來可以嘗試透過 ctr 去 Pin
ctr -n k8s.io images label xxxxxxxx io.cri-containerd.pinned=pinned
由於系統的硬碟空間只有 30G,因此我使用下列的腳本下載不同的 Image 並嘗試使得硬碟使用量超出 HighThresholdPercent (85%) 並且觸發相關資訊。
kubectl run a --image=docker.io/library/node:bullseye                                                                                                                       [1851/4810]
kubectl run a1 --image=docker.io/library/node:current-bookworm
kubectl run a2 --image=docker.io/library/node:bookworm
kubectl run a3 --image=docker.io/library/node:current
kubectl run a4 --image=docker.io/library/node:20.8.0-bullseye
kubectl run a5 --image=docker.io/library/openjdk:22-oraclekubectl run a6 --image=docker.io/library/jenkins:2.60.1
kubectl run a7 --image=docker.io/library/jenkins:2.60.2
kubectl run a8 --image=docker.io/library/jenkins:2.60.3
kubectl run a9 --image=docker.io/library/jenkins:2.46.2
kubectl run a10 --image=docker.io/library/jenkins:2.46.1
kubectl run a11 --image=docker.io/pytorch/pytorch:latest
kubectl run a12 --image=docker.io/pytorch/pytorch:2.0.1-cuda11.7-cudnn8-devel
此外我環境部署中,有特別開啟 kubelet 的設定檔案,打開其 log 等級來觀看更多運作 log。
接下來透過下列指令觀察 kubelet 指令並且觀察當硬碟空間超過後的相關 log
$ sudo journalctl -f -u kubelet | grep image_gc
以下是當系統空間超過 HighThresholdPercent 後的相關 Log (移除用不到的資訊方便閱讀)
image_gc_manager.go:340] "Attempting to delete unused images"
...
image_gc_manager.go:255] "Adding image ID to currentImages" imageID="sha256:112170efb091e6c02eac19703986e3c59ce11e86
b826c1d70a4a4a73a333339b"
image_gc_manager.go:272] "Image ID has size" imageID="sha256:112170efb091e6c02eac19703986e3c59ce11e86b826c1d70a4a4a7
3a333339b" size=366064122
image_gc_manager.go:275] "Image ID is pinned" imageID="sha256:112170efb091e6c02eac19703986e3c59ce11e86b826c1d70a4a4a
73a333339b" pinned=true
...
image_gc_manager.go:364] "Image ID is being used" imageID="sha256:c62308471249574d567c4fff9a927451ac999f50fe9190ceb50e9949922762ef"
image_gc_manager.go:364] "Image ID is being used" imageID="sha256:677ad13d73108d775aec52e9bd38c33042ad14bb3a780b67613b8eb7be5de5b2"
image_gc_manager.go:369] "Image is pinned, skipping garbage collection" imageID="sha256:6270bb605e12e581514ada5fd5b3216f727db55dc87d5889c790e4c760683fee"
image_gc_manager.go:364] "Image ID is being used" imageID="sha256:8065b798a4d6729605e3706c202db657bfbcb8109127ece6af5bfb6da106adb7"
從上述的 log 看起來似乎運作正常,但是仔細觀察後發現所有手動加入 pinned 的 image 都沒有順利地被偵測到有 "pinned=true",只有預設的 puase image 有被偵測到。
透過 crictl 指令觀察,會發現對於 Kubernetes 來說,並不認為該 Image 有被標示為 pinned
$ sudo crictl inspecti docker.io/library/jenkins:2.60.2
{
  "status": {
    "id": "sha256:112170efb091e6c02eac19703986e3c59ce11e86b826c1d70a4a4a73a333339b",
    "repoTags": [
      "docker.io/library/jenkins:2.60.2"
    ],
    "repoDigests": [
      "docker.io/library/jenkins@sha256:5d628badc50487581da2b4cb95a7589fe1d39922391e128f6a031273ad351b71"
    ],
    "size": "366064122",
    "uid": null,
    "username": "jenkins",
    "spec": null,
    "pinned": false
  },
經過反覆實驗後觀察到若採用 ctr image label 加上的 label 似乎不會被認可為 pinned,只有透過 ctr image pull 的才有辦法被正式被辨識。
另外 kubelet 沒有辦法辨識的問題實際上是一個實作的 bug,該 bug 已經於PR Pass Pinned field to kubecontainer.Image 給修復,該修復預計於 v1.29 一起釋出。
因此嘗試下載 v1.29.0-alpha.1 版本的 kubelet並且進行替換來驗證,最後整個功能運作如預期,能夠順利的跳過 pinned image。
Summary
最後以一張圖來概括上述的流程
